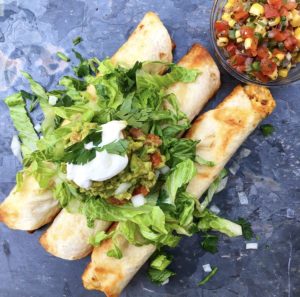
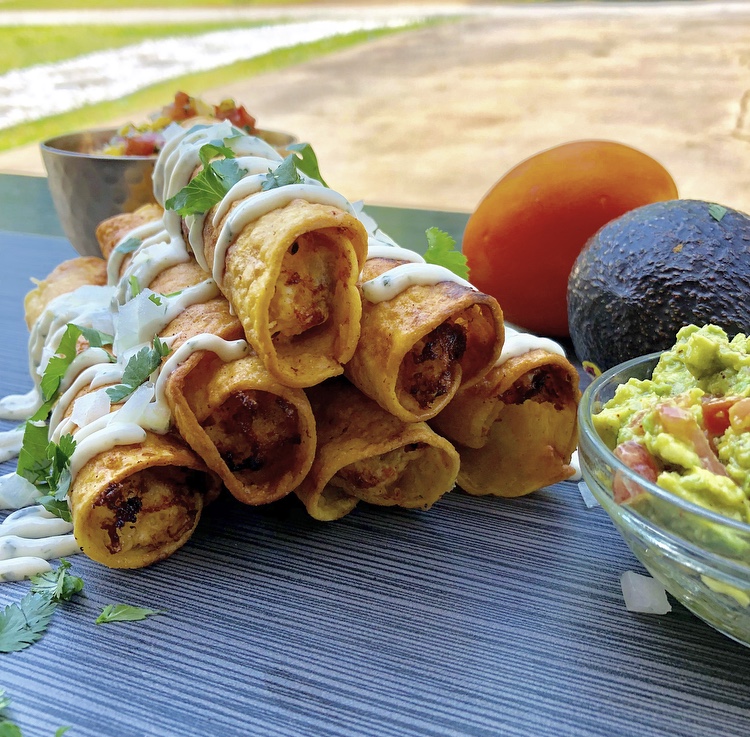
Whole Post

In honor of “Cinco de Mayo” this year I wanted to share one of my favorite Mexican dishes “Taquitos“. You may ask yourself “What are Taquitos?” A Mexican dish consisting of a small tortilla that is rolled around a filling of meat and cheese and then deep-fried. Tacos are usually folded, and these taquitos (aka Flautas) are rolled. In this particular recipe I used cream cheese inside the filling to give that extra creamy taste. This recipe can be #gluten-free if using corn tortillas but if using flour tortillas you will have a more fully texture rather than crispy. These can be made a head of time; the cream cheese and chicken mix freezes well. I just place in freezer-safe Ziploc bags and get as much air out. They day I’m ready to make them, I just pull them from the freezer and let them thaw completely, which is perfect for those super busy days. Taquitos are great for dinner parties with friends and family!
(You can also bake the taquitos see my note at the end of the recipe)
Happy Eating!

Chicken Taquitos

Prep Time 5 minutes
Cook Time 10 minutes
Total Time 15 minutes

Ingredients

3 cups chicken cooked and shredded
6 oz cream cheese softened (Optional)
1/3 cup sour cream
1/2 cup Mexican shredded cheese blend
1/4 cup green onion
1/4 cup chopped white onion
1/3 cup chopped red bell pepper
12 6 inch corn tortillas
vegetable or canola oil for frying

Directions

1. Heat ½” oil in a sauce pan on medium heat.
2. In a large bowl mix together the chicken, cream cheese, sour cream, onion, shredded cheese and peppers. Add salt and pepper to taste.
Once oil is hot enough (place hand over pan, above oil, to feel heat), add a few tablespoons of chicken/cream cheese mixture to the center of a tortilla and spread out. Roll up and set seam side down in oil using tongs. Cook until golden brown on both sides.
4. Repeat until all the tortillas are filled, rolled and fried. Set on paper towels to drain.
5. Serve warm and ENJOY!

Baking Note: Pre-heat oven to 350 degrees. Place seamed side down in a lightly greased 9×13 baking dish. Repeat with the remaining tortillas. Bake at 350 for 30 minutes. Serve immediately and enjoy!


History Lesson!!!

“Flautas” is Spanish for “flutes.” If you’ve ever had this cuisine at a Mexican restaurant, you’ll immediately understand why.
Flautas are made from tortillas (usually flour) that are filled and then rolled up and fried. The result: a long, thin, flute-shaped roll that’s extra-crispy and bursting with a savory, spiced filling.
Flautas are often called “taquitos,” “tacos dorados,” and vice-versa. Are they the same things, though?
Not exactly!
The main differences don’t have to do with flavor, but rather with size and shape. Often, a true flauta will be longer and thinner than a taquito because they’re made from larger tortillas. Taquitos are usually shorter, and may even be flatter because of the way they’re rolled.

Happy Eating – Chef Mark Phillips 

Italian food is probably one of my favorite food cultures. I personally do not eat beef and pork which are traditional ingredients in Italian meatballs so I have created my own flavorful twist (note: you can add beef and pork in replacement of turkey).  The mushrooms and kale inside the meatballs add extra moisture to help prevent from drying out while adding additional flavor. Also there are no eggs or breadcrumbs in my recipe so this makes #gluten-free and #dairy-free. Pasta: one of my weaknesses! So of course I placed my meatballs over spaghetti but you can eat them by themselves, with French bread or rice.

Happy Eating!!!

Kale & Cremini Mushroom Turkey Meatballs

Serves : 4

Prep: 20 mins
Cook: 20 mins
Total: 40 mins

Ingredients   (The Meatballs)

1 lb. lean ground turkey
1/2 medium onion, grated
4-5 roasted garlic cloves, minced
1/4 cup finely chopped kale
1/4 cup finely chopped cremini mushrooms
1 Tbl fresh basil, chopped
1/2 tsp salt
2 tsp olive oil
1/2 tsp ground pepper

The Sauce

1 Tbl olive oil
1 small onion, chopped
3 roasted garlic cloves, minced
1 tsp ground oregano
2 Tbl chopped basil
1/4 tsp red pepper flakes
1/4 tsp salt
1/4 tsp ground pepper
1 (28 oz.) can crushed tomatoes
1 (14 oz.) can crushed tomatoes
6 basil leaves, thinly sliced

Directions

The Meatballs:
1. Preheat the oven to 350 degrees F.
2.  In a large bowl, stir together the ground turkey, onion, garlic, basil, mushrooms, kale, salt and pepper.
3. Divide the mixture into 8 portions, form into balls and set aside.
4. In a non-stick pan over medium high heat and 2 tablespoons olive oil. Sear Meatballs on both sides (approximately 3 mins per side) and place on a plate then set aside.

The Sauce:
1. Use the same skillet from the meatballs Heat the olive oil and set over medium heat. Add the onion and cook until softened, about 5 minutes.
2. Stir in the garlic, oregano, red pepper flakes, bay leaves, salt and pepper, and cook for 1 minute.
3. Add the crushed tomatoes, bring the sauce to a boil, and then simmer for 10 minutes. Stir in the basil.
4. Nestle the meatballs into the sauce and spoon sauce over to coat the meatballs. Place in preheated oven and cook for 20 minutes.
5. Remove from oven and let stand for 5-10 mins. Serve over pasta or rice, or on their own.


” My mom said the two most important kitchen utensils are attached to your arms… you cannot mix up meatballs with a wooden spoon, get in there, get your fingers dirty!”

Rachael Ray

After I graduated college I went to Maine with my uncle for the first time. It was there that I experience my 1st true authentic “Lobster Roll” the meat was so fresh, the buttery roll toasted to perfection and the lemon mayo was perfect.  Ever since then I make it a point to try a lobster roll at different restaurants along my travels.  I have created my own version below that will be sure to satisfy you LOBSTER craving and these little babies are great for the spring and summer.  Make these for your next party; its sure to be a hit!
Happy Eating!

Mini Lobster Rolls

Serves 6

Ingredients:

  • 1/2 cup finely diced celery
  • 2 tbsp fresh lemon juice
  • 1/3 cup mayonnaise
  • 1/4 tsp white pepper
  • 1/4 tsp salt salt
  • 1/4 tsp onion powder
  • dash of cayenne pepper
  • 1 tablespoon chopped green onion
  • 4 packed cups cooked and cleaned lobster meat (from about 3 1 1/2 lb lobsters), cut into bite-sized chunks
  • 6 top split Hawaiian Sweet Rolls (top split)
  • 3 tablespoons salted butter, melted

Directions:

  1. Place the celery, lemon juice, mayo, white pepper, salt, onion powder, cayenne pepper and green onions in a bowl and whisk to combine. Gently fold in the lobster meat. Wrap and chill until ready to serve. It will stay good, wrapped tightly in the fridge, for about two days tops.
  2. Toast the sweet rolls buns for about one minute, so they are lightly golden ad crisped, but still soft. Brush a little bit of melted butter in each bun. Mix the chilled lobster salad well. Top each buttered bun with a generous amount of lobster and serve immediately.


“When I get a chance to play golf or go on a boat with good people, take the boat out and put some lobsters on the grill, get the ice-cold beer and the cigars – that’s heaven here on earth.”

Bernie Mac

My two weakness; bread and PASTA! While you would think of pasta as a culturally Italian food, it is likely the descendent of ancient Asian noodles. A common belief about pasta is that it was brought to Italy from China by Marco Polo during the 13th century.  I am personally not to picky on what type of noodle I eat however whenever its tossed in a sauce whether that be cream, tomato or olive oil;  I am here for it.  I am not sure what the mass perception is about pasta and how to make it, but contrary to what you may think it is very easy to make.  Clients love the fresh “al dente” (firm to the bite or the Italian saying “to the tooth”) of the pasta when it is home made and if you go to most authentic Italian restaurants you will experience this as well.

I have put together a step-by-step guide on how to make pasta from scratch along with images so you can visually see the process. I tried to make the recipe as simple as possible using utensils that most people have in their home.  Feel free to drop me a comment and let me know how your pasta turned out.

Happy Eating!!!


How to make Pasta from scratch?

Ingredients

1 cup All-purpose flour

1 cup Semolina flour

1 teaspoon kosher salt

3 Eggs

1 Tablespoon olive oil

Rolling pin

Pizza cutter or dough scraper/chopped

Directions

Step 1: Stir Together Salt and Flour
On a flat work surface, stir together the flour and salt in a mound.

Step 2: Make a Well
Make a deep well in the center of the mound, making sure the walls are fairly thick but the well is large enough to hold three eggs.

Step 3: Add the Eggs
One at a time, crack the eggs into the center of the well and olive oil.

Step 4: Stir
Stir the eggs in the center, gradually adding the flour from the walls until all the flour has been moistened.

Step 5: Form Into a Ball
Pull together the flour and eggs, kneading it into a ball.

Step 6 & 7: Start Kneading
Knead the ball of dough firmly with both hands.  Knead Some More, continue kneading until the ball is smooth and elastic; this will take about 8-12 minutes. This process creates a nice, chewy pasta instead of what would taste like boiled pie crust.

Step 8: Form Into a Ball
Once the pasta dough is smooth and elastic, form into a ball

Step 9: Rest
Cover the dough in plastic wrap and allow it to rest for at least 45 minutes to hour.

Step 10: Divide
Divide the dough into 4 equal pieces. Cover the pieces you aren’t working with to prevent them from drying out.

Step 11: Roll
One at a time roll the dough pieces into very thin rectangles.

Step 12: Fold
Fold the dough into a flat roll about two inches wide.

Step 13: Cut
Cut the pasta into even ribbons, from 1/8-inch to 1/2-inch depending on preference. Stay consistent once you pick a size to insure that your pasta cooks evenly.

Step 14: Unfurl
Unfurl the pasta into long noodles.

Step 15: Cook Immediately or Dry
If you plan to cook immediately, move to step 16. If you want to dry for later use, either coil the pasta into loose nests and allow to dry, or hang the pasta over a drying rack or coat hanger. Remember that no matter how you dry the pasta, this will be the shape it will need to stored in, very long pasta will need a very long storage container. You can place pasta nests into freezer bags and freeze for 2-3 months.

Step 16: Cook It
Bring a pot of heavily salted water to boil. Add your fresh or dried pasta, boiling until al dente (this will take longer for dried pasta and only a few minutes for fresh). Serve immediately with desired sauce.


“Not only are pasta dishes delicious, but they are also great, easy options for a quick dinner during a busy weekday. “

Marcus Samuelsson